Wednesday, February 27, 2019

VMware Home Lab 1.0

GREAT DAY IN THE MORNING!!!!!

Alright I had to find a different way to start this post, so I decided to borrow Pierre Roberts Catch phrase. I don't think it worked so he can have it back. 

I wanted to take the time to talk about my home lab that I am currently using. As I mentioned in a previous post I have a Razer Blade 2018 which I will be using to run my lab for now. 

Stock the laptop comes with:

  • 8th Gen Intel Core i7 - 8750H Processor 6 Cores/12 threads up to 4.1 GHz
  • 1 TB M.2 SSD
  • 16 GB of RAM. 
I have been wanting to upgrade it to 32 GB of RAM since I purchased it, however $400 for 32 GB of RAM was just too much for me to swallow at the time. 

I had been watching the price of RAM (particularly for this laptop) for the last few months and saw that it was steadily declining. I finally decided to pull the trigger when it was down to 49% off on Amazon. 

The RAM Arrived a few days ago, and I installed it in the laptop, and I have to say it is awesome. I have never seen a laptop run this good. 

I installed VMWare Workstation Professional 15 (Thank you VMUG Advantage) and I will have a install guide out for that soon. 

I am also beginning to Spec out my VMware Home Lab 2.0 which will also be a Nested Solution. I will probably leverage my Kit.com account to show my parts list once I get it running. 

I hope you find this post helpful and stay tuned for updates.

Friday, February 22, 2019

How to add a VM to inventory

So like I mentioned in a previous post, I have been trying to help people out on VMNT or VMware Community forums. One of the posts that I helped out on involved someone who needed  help adding a VM to inventory after it was restored.

Here is how you can add a VM into inventory if it has been removed for some reason


From vCenter, you will need to click on a ESXi hosts


Then click on the Configure tab


Then click on Datastores and select the Datastore that the VM is stored on. 


Right Click the Datastore and select Browse Files


Locate the VM folder, and select the .VMX file


Right Click on the .VMX file ans select Register VM


This will open the Register Virtual Machine wizard. You will need to set the name (which should be pre-populated and select the Data center and click Next.


Select the Cluster and click Next


Select the Application Pool and Click Next


Click Finish to exit the Wizard


After you exit the Wizard you will see the Virtual Machine added to Inventory. 


As always I hope that this is helpful for someone. 

Friday, February 15, 2019

I didn't know this was even possible.... SSL Certificate weirdness

 So I was working on the post about how to resolve the SSL Certificate error message that you get if you do not have the Root certificate for the ESXi host installed on your machine. Well in the process of taking screen shots for that post I discovered something that I have never seen before.  Rather than starting from the beginning, lets pick up at the end of the last post.

So right after you finish installing the Root CA on your machine, you have closed out of your web browser and reopened it and go to the URL and you get this message.

On first glance it looks like the certificate install failed, but it didn't, Upon closer inspection of the message you will see that there is an issue with the CN is invalid. 

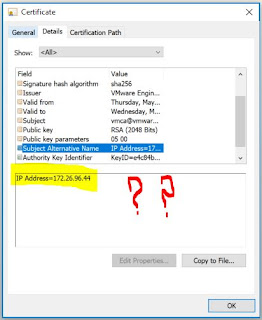
For those who do not know CN means Common Name which is usually the FQDN or Host name of the server. So I went back to check the CN of the Certificate of the ESXi host and I found what you see below.  This is where things get crazy....


So according to the image above, the SAN or Subject Alternate Name (AKA a list of CN's, usually up to 5 on one Certificate) is an IP Address!!! How the heck is it an IP address? 

So what I tried next was typing in https://172.26.96.44 in my web browser and I was immediately presented with the image below. 


So wait, it worked like it should using the IP address instead of the name. How did that certificate get issues at all.

WELL..... It would appear that one of my co-workers added this host to vCenter with the IP address instead of the name.


Needless to say I am very disappointed in my Co-Worker for not following our naming convention.  But if I had to guess it looks like VMCA (VMWare Certificate Authority) which is included in the PSC (Platform Services Controller) and issues Certificate to hosts when they are added to vCenter must have issues the certificate to the IP address because he added it using the IP. Having dealt with several different Certificate Authorities in my time, this is crazy to see. 

Anyway this is just a heads up just encase you run into something like this in your travels. 

Friday, February 8, 2019

How to get rid of Certificate Errors on ESXi hosts

Recently I have been spending a lot of time on the VMware Community forums just reading posts and helping out where I can. One of the threads that I helped out with had to do with how you can get rid of the pesky SSL Certificate error message you get every time connect to an ESXi host. 

To resolve this issue you will need to add the Root Certificate for the ESXi host (the Certificate of the server who issued the certificate for the ESXi host) into the Trusted Certificate Authority Folder on your machine. 


To start you need to go to the web page for the ESXi host 


You will notice a few thing, first of all, I used an ESXi 6.0 host that I had in my lab and secondly you will see the RED background color in the address bar. You will need to click on the Certificate Error message as seen in the next picture.


From there you will get this pop up message


Click on View certificates to see the Client Certificate which is assigned to the host. You will then this the Certificate popup.


You will need to click on Certificate Path to see the CA


From here you will see all the Certificates in the Chain, in this case there are only 2


Click on the root certificate ( the one on the top of the chain) and click the View Certificates button to be able to see the certificate attributes. 


A new Certificate window will open and you can click the Install Certificate Button to install it on your machine


This will open the Certificate Import Wizard.


You will need to click the Local Machine radio button and click next.


Select the Place all certificates in the following store


 Click the Browse button to select where the certificate should be saved.


Select Trusted Root Certification Authorities and click OK


Click Next to Continue


Click Finish to exit the Wizard


You will then get this pop-up message, click OK to continue.


Click OK again


and click OK one more time


 Then close out your Web Browser, reopen it and go back to the web page and you will no longer have red bar going across the screen.


 I hope you find this helpful, I have a few more articles in the pipeline and I am working on getting out soon.

Friday, February 1, 2019

RVTools - A VMware Admin's best friend

Today I would like to talk about one of my favorite tools that I use both internally and with my clients.

RVTools - https://www.robware.net/rvtools/

RVTools is a free utility that you can use to discover what is going on with your VMware Environment. All you have to do it install the client on your machine and in a few minutes you are able to log into your vSphere Environment (using your normal vSphere Credentials) and it will give you a read out of your entire environment.

From the login Screen the look and feel is very reminiscent of the old C# vSphere Client used back in 5.x and 6.0 days.

Once you log in you are presented with the vInfo tab which is a summary of everything going on with the vSphere/ESXi host you Connected to.


Along the top you will see a series to tabs that will drill down into the various components of your environment such as the ones seen below


I am only going to cover a few of these features, but I encourage you to try it out for your self.

 vCD will show you what Virtual Machine has a CD Drive installed on it, if it is connected, and what .ISO is currently connected to it. So ,.for instance, if you have a Virtual Machine that will not vMotion, you could use this tool to see if it is attached to a .ISO that is on Local Storage.


vSnapshot will show you all the Virtual Machines that have snapshots associated with it. It will report back to you the name of the Virtual Machine, the name of the Snapshot, the Date/Time it was taken, and the File Name of the snapshot.


And Lastly we will touch on the vHealth tab. This tab will give you advice on things that you may not realize is going on in your environment such as inconsistent naming, Host logs not being stored on persistent storage, VMware tools being out of date, and Zombies (Files that exist on Datastores, but are not in inventory).


On a final note that I forgot to mention, If you go up into the file menu you are able to export everything you see in the tool to a .CSV which can become very handy for documenting your environment. 

I hope you find this post useful and if you do download this product, please consider donating to it's creator. Without tools like this it would make all of our jobs much harder. 

I have moved!!!

Please check out my new blog which now contains all my old posts and some new goodies as well.  I can now be found at http://www.kenbshinn.c...