I have recently been working on an issue with a PowerCLI script that has been working for a few weeks that just stopped working. The script is modified version of the one Kyle Ruddy posted about here:
https://blogs.vmware.com/PowerCLI/2018/07/automate-file-based-backup-of-vcsa.html
The script also uses Credentials store to be able to run the script securely but other than that the script is pretty vanilla.
Now that you are up to speed with how it is supposed to work, my next post will cover the issue, and how to resolve it.
Showing posts with label PowerShell. Show all posts
Showing posts with label PowerShell. Show all posts
Friday, December 13, 2019

Friday, December 6, 2019
PowerCLI - Datastore Report
I recently was working in an environment where they are still running vSphere 6.0. While doing some storage expansions I discovered that the Flash Client and the C# Client were not reporting the same size on the Datastore. This can be very frustrating as you are not sure which one you can trust. So as a tie breaker I decided to turn to my good friend PowerCLI.
It turns out that the PowerCLI and the C# client were reporting the same thing. So I decided to create a PowerCLI Script to assist me in my work. You can find the script there on my Github:
https://github.com/kenbshinn/PowerCLI-Scripts/blob/master/VM_Datastore_Report.ps1
I hope you found this post helpful and will share it with your friends.
It turns out that the PowerCLI and the C# client were reporting the same thing. So I decided to create a PowerCLI Script to assist me in my work. You can find the script there on my Github:
https://github.com/kenbshinn/PowerCLI-Scripts/blob/master/VM_Datastore_Report.ps1
I hope you found this post helpful and will share it with your friends.
Friday, November 29, 2019
PowerCLI - Virtual Host Hardware Information
I have recently been working on a asset inventory issue where I was provided a list of serial numbers from our hardware vendor and I was asked to reconcile it with what we had. Well that is easier said than done in most cases.
I know that vCenter collects a bunch of hardware information and I wanted to see if there was a way to pull the Serial number that is on the System board and put that information into a .csv.
In comes the following command:
Get-VMHost | Get-VMHostHardware -SkipAllSslCertificateChecks | Export-Csv C:\temp\VMHostHardware.csv
This command will pull all the hardware information that vCenter records and puts it to a .CSV.
I will do my best to update this post with an example of what the results will look like.
I hope you find this post helpful, if so please share with your friends.
I know that vCenter collects a bunch of hardware information and I wanted to see if there was a way to pull the Serial number that is on the System board and put that information into a .csv.
In comes the following command:
Get-VMHost | Get-VMHostHardware -SkipAllSslCertificateChecks | Export-Csv C:\temp\VMHostHardware.csv
This command will pull all the hardware information that vCenter records and puts it to a .CSV.
I will do my best to update this post with an example of what the results will look like.
I hope you find this post helpful, if so please share with your friends.
Saturday, November 23, 2019
PowerCLI - vSphere Role Privilege report
So I have been looking for ways to expand my knowledge with PowerCLI. This whole effort came about from going to VMWorld 2019 in San Francisco and seeing presentations by Kyle Ruddy and Luc Denkens. Let me tell you, they did some amazing things in their presentations.
I had been working on a project where I needed to get list of all of the Non-Standard vCenter Roles along with the privileges assigned to those roles. I am still very new to this whole PowerCLI thing, but my google skills are top notch. I found a blog post on this blog http://kunaludapi.blogspot.com/
I ran the script to see how well it worked and it worked as advertised. I created a copy of the script on my Github which you can find here: https://github.com/kenbshinn/PowerCLI-Scripts/blob/master/vSphere_Role_Report.ps1
I hope you find this post helpful, and if you do please share it with your friends and colleagues.
Friday, October 25, 2019
How to unlock and reset SSO password in vSphere 6.x (2146224)
So I have a bit of a embarrassing confession to make. I forgot to record the Administrator password for my VCSA Appliance. Total disclosure, I was freaking out and I really thought I was going to have to start from scratch. I did some research I was surprised to find out that you can actually reset the Administrator account on a VCSA appliance as long as you have the root password for the appliance and you have access to the VCSA Console. Below are a list of the links to the KB Articles from VMware.
Resetting SSO Administrator Password
https://kb.vmware.com/s/article/2034608
Resetting SSO Administrator - VCSA 6.x
Below is the PUTTY session as an example.
shinnk@Computer:~$ ssh root@devvcsa01.xxxx.xxxxx
ssh: Could not resolve hostname devvcsa01.xxx.xxxxx: Name or service not known
shinnk@Computer:~$ ssh root@172.26.44.18
The authenticity of host '172.26.44.18 (172.26.44.18)' can't be established.
ECDSA key fingerprint is SHA256:7E4K1HVpg2ExWz+vEkkRdJ0M5jUYftb3HZw6OSDKFEICSOEPWWKYERe4.
Are you sure you want to continue connecting (yes/no)? yes
Warning: Permanently added '172.26.44.18' (ECDSA) to the list of known hosts.
VMware vCenter Server Appliance 6.5.0.21000
Type: vCenter Server with an embedded Platform Services Controller
Password:
Connected to service
* List APIs: "help api list"
* List Plugins: "help pi list"
* Launch BASH: "shell"
Command> shell.set --enabled true
Command> shell
Shell access is granted to root
root@devvcsa01 [ ~ ]# /usr/lib/vmware-vmdir/bin/vdcadmintool
==================
Please select:
0. exit
1. Test LDAP connectivity
2. Force start replication cycle
3. Reset account password
4. Set log level and mask
5. Set vmdir state
6. Get vmdir state
7. Get vmdir log level and mask
==================
3
Please enter account UPN : Administrator@vsphere.local
New password is -
/a+p|8M?vRl`%"p4*+oZ
==================
Please select:
0. exit
1. Test LDAP connectivity
2. Force start replication cycle
3. Reset account password
4. Set log level and mask
5. Set vmdir state
6. Get vmdir state
7. Get vmdir log level and mask
==================
Once you go through all these steps you are now able to log into VCSA with that temporary password that you are given and you are also able to reset it as well.
I hope you find this post helpful, and if you do please share it out to your friends.
Friday, October 18, 2019
Getting past Certificate issue in Power CLI
So I recently started working more with PowerCLI. After my time at VMWorld 2019 (which I will cover in another post) I realized how powerful that PowerCLI actually is (pun not intended). In starting to work with PowerCLI I came across the following message whil: trying to connect to my vCenter
Connect-vIServer : xx-x-xxxx xx:xx:xx Connect-VIServer Error: Invalid server certificate. Use Set-PowerCLIConfiguration to set the value for the InvalidCertificateAction option to Prompt if you’d like to connect once or to add a permanent exception for this server.I did some googling and I found this article,so shout out to Ivo Beerens for his article.
https://www.ivobeerens.nl/
In his article he goes on to share this command
Set-PowerCLIConfiguration -InvalidCertificateAction Ignore -Confirm:$falseAfter putting that into PowerShell and pressing enter you will no longer get the Invalid Certificate message.
I hope you found this post helpful, I will be posting about some of the scripts that I have been posting on my Github. Please share with your friends if you found this helpful.
Friday, October 11, 2019
Enable a Remote Mailbox in Office 365
So I recently ran into an issue where I had a user who's Local AD account had been deleted but their Office 365 Mailbox was still showing up. We tried to bring the user account back, however the AD recycle bin was not enabled. So we had to create a brand new account for the user and then work from there.
We originally planned to create a new mailbox and let the user start from scratch. However we ran into an issue were the old mailbox would not go away, and it was preventing us from migrating a new mailbox into Exchange Online for the user.
I then found the following Exchange Management Shell command which will allow you to connect the local AD account to the Exchange Online Mailbox.
After running the command the user is now able to log in with their new AD account and have access to their mailbox.
I hope you found this post helpful, and if you did, please share it with your friends.
We originally planned to create a new mailbox and let the user start from scratch. However we ran into an issue were the old mailbox would not go away, and it was preventing us from migrating a new mailbox into Exchange Online for the user.
I then found the following Exchange Management Shell command which will allow you to connect the local AD account to the Exchange Online Mailbox.
Enable-RemoteMailbox USERNAME -RemoteRoutingAddress Alias@domain.onmicrosoft.com
After running the command the user is now able to log in with their new AD account and have access to their mailbox.
I hope you found this post helpful, and if you did, please share it with your friends.
Friday, July 26, 2019
Power off entire Virtual Environment using a PowerShell Script and PowerCLI
So I have a lab that I manage where we have had several scheduled power outages in the last few months. So it is my job to make sure that we power off the lab so none of our equipment have issues when we bring it back up.
I would estimate that our lab is comprised of about 90% VMware ESXi Hosts, and after going through the exercise of powering off the whole lab 1 or 2 times, it became it bit of a pain.
So I created a PowerShell Script using PowerCLI to not only power off all the Virtual Machine, but also the Virtual Hosts, and the VCSA appliance itself.
I have posted the script to my Github which you an check out here:
https://github.com/kenbshinn/Poweroff_VirtualEnvironment
Feel free to check it out and let me know what you think.
I hope you found this post helpful, and if so, please share it with your friends.
I would estimate that our lab is comprised of about 90% VMware ESXi Hosts, and after going through the exercise of powering off the whole lab 1 or 2 times, it became it bit of a pain.
So I created a PowerShell Script using PowerCLI to not only power off all the Virtual Machine, but also the Virtual Hosts, and the VCSA appliance itself.
I have posted the script to my Github which you an check out here:
https://github.com/kenbshinn/Poweroff_VirtualEnvironment
Feel free to check it out and let me know what you think.
I hope you found this post helpful, and if so, please share it with your friends.
Friday, January 25, 2019
PowerShell - Windows Update report to .CSV
A while back I was asked by my boss to come up with a way to get a report of all the Windows Updates installed on a remote server that is at a client's site and that we do not have access to.
I thought to myself that he must be crazy to think that we could even find a utility that would enable us to do that.
Well..... Apparently with the right Power Shell Commands you can do it. Here is the Syntax for the Script that you will need to save as a .ps1
The result looks something like this:
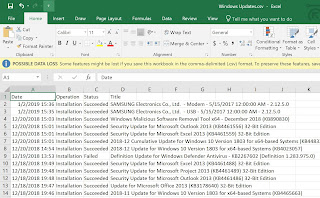
I hope you find this post helpful and are able to use this going forward.
I thought to myself that he must be crazy to think that we could even find a utility that would enable us to do that.
Well..... Apparently with the right Power Shell Commands you can do it. Here is the Syntax for the Script that you will need to save as a .ps1
$Session = New-Object -ComObject "Microsoft.Update.Session"
$Searcher = $Session.CreateUpdateSearcher()
$historyCount = $Searcher.GetTotalHistoryCount()
$Searcher.QueryHistory(0, $historyCount) | Select-Object Date,
@{name="Operation"; expression={switch($_.operation){
1 {"Installation"}; 2 {"Uninstallation"}; 3 {"Other"}}}},
@{name="Status"; expression={switch($_.resultcode){
1 {"In Progress"}; 2 {"Succeeded"}; 3 {"Succeeded With Errors"};
4 {"Failed"}; 5 {"Aborted"}
}}}, Title | Export-Csv -NoType "$Env:userprofile\Desktop\Windows Updates.csv"
The result looks something like this:

I hope you find this post helpful and are able to use this going forward.
Friday, January 18, 2019
Office 365 user names with ADSync have the OnMicrosoft.com Domain
So I have been working on a Exchange 2016/Office 365 Hybrid solution. Part of the setup is to install and configure ADSync which depending on the day of the week it could either be a Office 365 or Azure Utility. I have honestly installed this tool several times, and it is never in the same place every time I need to download it.
Once ADSync is installed, It will sync your Local AD Users to Office 365/Azure AD. Depending on how you configure the Sync, it could synchronize the whole AD Forrest, an OU (or Multiple OUs), or a Group. In my case I selected 1 of our OUs.
Within 30 minutes all of my users in that OU were sync'd with Office 365/Azure AD. However all of my users had a @company.OnMicrosoft.com user name. Normally this would not be a problem, however I am sure this would be confusing to some users. I also noticed that the usernames were also not consistent either. Some of them looked like this:
shinnk@companyname.OnMicrosoft.com
or
Ken.Shinn@Companyname.OnMicrosoft.com
After scouring the internet I found nothing on how to fix this for my users. I was just about to open a ticket with Office 365 Support when I found a Technet Article that talked about how the usernames are generated when using ADSync.
To Paraphrase the article, the username in Office 365 is set by the user's Alias set in Exchange. Which led me to believe that we really have some inconsistent naming going on at my office but that is for another day.
The Article also covered how to change the user names. This let me to believe that I could use this same method for changing the domain name as well, and it worked!
Here is what you will need to do
Connect to Office 365:
Connect-MsolService
Then use this command:
Set-MsolUserPrincipalName -UserPrincipalName Alias@companyname.onmicrosoft.com -NewUserPrincipalName FirstName.LastName@domain.com
If you don't get an error message then you should be able to click the refresh button in Office 365 for the user account and you will see the new name.
Once ADSync is installed, It will sync your Local AD Users to Office 365/Azure AD. Depending on how you configure the Sync, it could synchronize the whole AD Forrest, an OU (or Multiple OUs), or a Group. In my case I selected 1 of our OUs.
Within 30 minutes all of my users in that OU were sync'd with Office 365/Azure AD. However all of my users had a @company.OnMicrosoft.com user name. Normally this would not be a problem, however I am sure this would be confusing to some users. I also noticed that the usernames were also not consistent either. Some of them looked like this:
shinnk@companyname.OnMicrosoft.com
or
Ken.Shinn@Companyname.OnMicrosoft.com
After scouring the internet I found nothing on how to fix this for my users. I was just about to open a ticket with Office 365 Support when I found a Technet Article that talked about how the usernames are generated when using ADSync.
To Paraphrase the article, the username in Office 365 is set by the user's Alias set in Exchange. Which led me to believe that we really have some inconsistent naming going on at my office but that is for another day.
The Article also covered how to change the user names. This let me to believe that I could use this same method for changing the domain name as well, and it worked!
Here is what you will need to do
Connect to Office 365:
Connect-MsolService
Then use this command:
Set-MsolUserPrincipalName -UserPrincipalName Alias@companyname.onmicrosoft.com -NewUserPrincipalName FirstName.LastName@domain.com
If you don't get an error message then you should be able to click the refresh button in Office 365 for the user account and you will see the new name.
Friday, August 17, 2018
The Woes of being a SysAdmin.....
So last night I was called into our Data Center due to an outage. Once everything came back up we noticed an issue with our Exchange Archive Server which lives at that Data Center. From outlook we were not able to access our In-Place Archives, however we could do it from OWA (Weird Right?)
This morning I looked into the issue further and when I tried to open the Exchange Management Shell on that server I got this message 3 times.
New-PSSession : [ServerName.domain.local] Connecting to remote server ServerName.Domain.local failed with the following error
message : [ClientAccessServer=ServerName,BackEndServer=ServerName.Domain.local,RequestId=2de56d73-34a8-46a9-9bdd-5c023e960cb5,
TimeStamp=8/6/2018 3:14:08 PM] [FailureCategory=Cafe-SendFailure] For more information, see the
about_Remote_Troubleshooting Help topic.
At line:1 char:1
+ New-PSSession -ConnectionURI "$connectionUri" -ConfigurationName Microsoft.Excha ...
+ ~~~~~~~~~~~~~~~~~~~~~~~~~~~~~~~~~~~~~~~~~~~~~~~~~~~~~~~~~~~~~~~~~~~~~~~~~~~~~~~~
+ CategoryInfo : OpenError: (System.Manageme....RemoteRunspace:RemoteRunspace) [New-PSSession], PSRemotin
gTransportException
+ FullyQualifiedErrorId : -2144108477,PSSessionOpenFailed
So I tried to google this error message and let me tell you, if you try, good luck. There was literally no information about it. I then ended up googling this part of the message:
FailureCategory=Cafe-SendFailure
This let me to a Microsoft Answers thread which guided me to look at another blog which then said to check the SSL Binding on both the Website and Exchange Back end in IIS on the host. I discovered the the Exchange Back end did not have a binding for port 444. So I pointed it to the proper certificate and after and IIS reset it worked like magic.
This morning I looked into the issue further and when I tried to open the Exchange Management Shell on that server I got this message 3 times.
New-PSSession : [ServerName.domain.local] Connecting to remote server ServerName.Domain.local failed with the following error
message : [ClientAccessServer=ServerName,BackEndServer=ServerName.Domain.local,RequestId=2de56d73-34a8-46a9-9bdd-5c023e960cb5,
TimeStamp=8/6/2018 3:14:08 PM] [FailureCategory=Cafe-SendFailure] For more information, see the
about_Remote_Troubleshooting Help topic.
At line:1 char:1
+ New-PSSession -ConnectionURI "$connectionUri" -ConfigurationName Microsoft.Excha ...
+ ~~~~~~~~~~~~~~~~~~~~~~~~~~~~~~~~~~~~~~~~~~~~~~~~~~~~~~~~~~~~~~~~~~~~~~~~~~~~~~~~
+ CategoryInfo : OpenError: (System.Manageme....RemoteRunspace:RemoteRunspace) [New-PSSession], PSRemotin
gTransportException
+ FullyQualifiedErrorId : -2144108477,PSSessionOpenFailed
So I tried to google this error message and let me tell you, if you try, good luck. There was literally no information about it. I then ended up googling this part of the message:
FailureCategory=Cafe-SendFailure
This let me to a Microsoft Answers thread which guided me to look at another blog which then said to check the SSL Binding on both the Website and Exchange Back end in IIS on the host. I discovered the the Exchange Back end did not have a binding for port 444. So I pointed it to the proper certificate and after and IIS reset it worked like magic.
Friday, August 3, 2018
How to install PowerCLI
Recently VMware has changed the way you install PowerCLI from being the standard MSI installer that we have all been used to for years, to downloading and installing it from the PowerShell Repository.
Here is the process for installing PowerCLI:
Open PowerShell by running it as an Administrator
Once PowerShell loads up you will want to change the Execution Policy to Remote Signed
Set-ExecutionPolicy RemoteSigned
Once that is done you can install PowerCLI by running this command:
Install-Module -Name VMware.PowerCLI -Scope CurrentUser
You will then be prompted at least twice to give your consent to download and install from an untrusted repository.
Here is the process for installing PowerCLI:
Open PowerShell by running it as an Administrator
Once PowerShell loads up you will want to change the Execution Policy to Remote Signed
Set-ExecutionPolicy RemoteSigned
Once that is done you can install PowerCLI by running this command:
Install-Module -Name VMware.PowerCLI -Scope CurrentUser
You will then be prompted at least twice to give your consent to download and install from an untrusted repository.
Monday, October 9, 2017
Unable to import Infoblox 7 OVA into vSphere 6.5
The other day I was tasked with deploying a Infoblox OVA in our Lab environment. I was under the impression that this was going to be a simple task however I found out from my Coworkers that about 3 people had already tired to deploy it an all had failed. After spending WAY too much time on this task I eventually figured it out. Here are the steps I took to get this working in my lab.
First I started out by just trying to install the .OVA the normal way using the Deploy OVF Template Wizard hoping that my colleagues were just having permissions issues. Then I was greeted with this screen below.

I then thought maybe something was wrong with the .OVA so I researched how to convert a .OVA to a .OVF and manually import it that way. It turns out all you need to use is use a product called 7zip and use it to extract the files from inside the .OVA.
 Once you go into the new directory you just created you will see that the .OVA is made up of 3 files
 I then tried to import those files and got the same result. Yay for consistency!!!
I then did some more reading and found that the issue may have been caused by a checksum error of the .ovf file so I found a PowerShell command that will tell me what the checksum of the .ovf file was
$(Get-FileHash .\vmname.ovf -Algorithm SHA1 | Select -ExpandProperty Hash).ToLower()
You then take the value that Powershell kicks back and put it into the vmname.MF file. You can open this file with any text editor. You should take care when pasting the checksum hash value into the .MF file that you only use lower case letters.
After that was all done I tried to import the .OVF which means you have to include all 3 files. I still had the same result. Then I reread the error message and found that the .MF file was referencing a file that did not exist is the .OVA.
nios-7.3.17-358620-2017-07-14-00-21-09-160G-1410-xen.ovf
So I went back into the .MF file and deleted the value that was not needed and tried the import again.
This time I was met with a different message

I then discovered I would need to disconnect my ESXi host from vCenter to make this work. Fortunately I discovered that by connecting to my ESXi Host using SSH I could stop the services necessary for communication with vCenter.
So I connected to the host via SSH and ran the following commands
/etc/init.d/vpxa stop
/etc/init.d/hostd restart
I attempted to deploy it again and it was successful. I then ran /etc/init.d/vpxa start to set everything back to normal, did a few refreshes in vCenter and we were good to go.
I hope this helps someone out there with the same issue.
First I started out by just trying to install the .OVA the normal way using the Deploy OVF Template Wizard hoping that my colleagues were just having permissions issues. Then I was greeted with this screen below.

I then thought maybe something was wrong with the .OVA so I researched how to convert a .OVA to a .OVF and manually import it that way. It turns out all you need to use is use a product called 7zip and use it to extract the files from inside the .OVA.


I then did some more reading and found that the issue may have been caused by a checksum error of the .ovf file so I found a PowerShell command that will tell me what the checksum of the .ovf file was
$(Get-FileHash .\vmname.ovf -Algorithm SHA1 | Select -ExpandProperty Hash).ToLower()
You then take the value that Powershell kicks back and put it into the vmname.MF file. You can open this file with any text editor. You should take care when pasting the checksum hash value into the .MF file that you only use lower case letters.
After that was all done I tried to import the .OVF which means you have to include all 3 files. I still had the same result. Then I reread the error message and found that the .MF file was referencing a file that did not exist is the .OVA.
nios-7.3.17-358620-2017-07-14-00-21-09-160G-1410-xen.ovf
So I went back into the .MF file and deleted the value that was not needed and tried the import again.
This time I was met with a different message

Issues detected with selected template. Details: – 17:3:SECTION_RESTRICTION: Section Product Section (Information about the installed software) not allowed on envelope.
After banging my head against my desk and cursing out by boss for a while I went back to the Google to find out what this error message means.
It turns out that this is in fact a know issue with Infoblox and they are planning on fixing it in version 8.2. However to get past this they recommend connecting directly to the virtual host and deploying it that way. You can read more about it on this blog that I found while searching for a fix.
So I connected directly to my virtual host and attempted to deploy it from there when I get this message
“The host is currently being managed by the vCenter Server with IP Address xx.xx.xx.xx. Changes to this host during the session may not be reflected in the vSphere Client sessions currently viewing the vCenter Server.”
So I connected to the host via SSH and ran the following commands
/etc/init.d/vpxa stop
/etc/init.d/hostd restart
I attempted to deploy it again and it was successful. I then ran /etc/init.d/vpxa start to set everything back to normal, did a few refreshes in vCenter and we were good to go.
I hope this helps someone out there with the same issue.
Sunday, September 10, 2017
Exchange 2016 - Powershell Virtual Directory not working
So one of the projects that I have been working on lately is to setup a Mobile Device Management (MDM) solution for my company. One of the requirement to get email to Sync for the mobile devices was to connect the MDM server to our internal Exchange 2016 server using PowerShell.
One of the issues that I had been running into for a few days was that the MDM was not able to authenticate to our Exchange Server. I went through everything I could think of to fix this issue and to get it working (Check Firewall ports, SSL Certificates, User Permissions) but nothing was working. Then I remembered back to an post I did on here before about Active Sync and how I had to use a PowerShell command to recreate the Virtual Directory with the correct URL at the time of creation otherwise it will cause PowerShell to fail when you try to connect to it externally.
Well the funny thing about this whole situation is that during my troubleshooting I had to remove the PowerShell virtual directory in order to recreate it. Well... It turns out when you remove the PowerShell directory it also disconnects your PowerShell session to the Exchange server. Now fortunately I have a second Exchange server on the same Domain so I was able to run the command to create a new PowerShell Virtual Directory on that server and after turning off the Require SSL check box I was able to connect to the server again. Also my connection to the MDM Server was working as well!!!
Here is the command s that I should have used to create the PowerShell Virtual Directory.
To Remove the PowerShell Virtual Directory:
Remove-PowerShellVirtualDirectory “Powershell (Default Web Site)”
To Create the New Virtual Directory:
New-PowerShellVirtualDirectory -Name Powershell -RequireSSL:$False
To Reset IIS
IISRESET /noforce
One of the issues that I had been running into for a few days was that the MDM was not able to authenticate to our Exchange Server. I went through everything I could think of to fix this issue and to get it working (Check Firewall ports, SSL Certificates, User Permissions) but nothing was working. Then I remembered back to an post I did on here before about Active Sync and how I had to use a PowerShell command to recreate the Virtual Directory with the correct URL at the time of creation otherwise it will cause PowerShell to fail when you try to connect to it externally.
Well the funny thing about this whole situation is that during my troubleshooting I had to remove the PowerShell virtual directory in order to recreate it. Well... It turns out when you remove the PowerShell directory it also disconnects your PowerShell session to the Exchange server. Now fortunately I have a second Exchange server on the same Domain so I was able to run the command to create a new PowerShell Virtual Directory on that server and after turning off the Require SSL check box I was able to connect to the server again. Also my connection to the MDM Server was working as well!!!
Here is the command s that I should have used to create the PowerShell Virtual Directory.
To Remove the PowerShell Virtual Directory:
Remove-PowerShellVirtualDirectory “Powershell (Default Web Site)”
To Create the New Virtual Directory:
New-PowerShellVirtualDirectory -Name Powershell -RequireSSL:$False
To Reset IIS
IISRESET /noforce
Subscribe to:
Posts (Atom)
-
 In a previous Post I mentioned an issue that I had with a Certificate template on my Internal Enterprise CA not showing up when I tried to r...
 -
So I have been looking for ways to expand my knowledge with PowerCLI. This whole effort came about from going to VMWorld 2019 in San Francis...
-
So I recently started working more with PowerCLI. After my time at VMWorld 2019 (which I will cover in another post) I realized how powerfu...